
Day Trading / Scalping with Optimal Trade Entrance
- 3-in-1 OTE (Optimal Trade Entrance) strategies: EMA Scalping, EMA Day Trading, Candlestick Bar Scalping
- Great for any trading instrument: Options, Futures, Indices, Stocks, Crypto or FOREX
- TP (Take-Profit) and SL (Stop-Loss) visual levels, labels and alerts
- Works on the most popular timeframes: 1M, 3M, 5M, 15M, 30M, 45M, 1H, 4H, D
- Includes preparation Alerts for scalping trading methods, so no trade will be missed
- Comes with static and dynamic SL (Stop-Loss) and TP (Take-Profit) systems
|
1) [OTE] EMA SCALPING - PROGRESSIVE STRATEGY
|
||||||||||
(click/tap picture/animation to enlarge) 
|
||||||||||
|
2) [OTE] EMA DAY TRADING - CONSERVATIVE STRATEGY
|
||||||||||
(click/tap picture/animation to enlarge) 
|
||||||||||
|
3) [OTE] CANDLESTICK BAR SCALPING STRATEGY
|
||||||||||
(click/tap picture/animation to enlarge) 
(click/tap picture/animation to enlarge) 
|
||||||||||
Technical Info
![]() Instructions
Instructions ![]() How-to
How-to
(Click or Tap to expand)
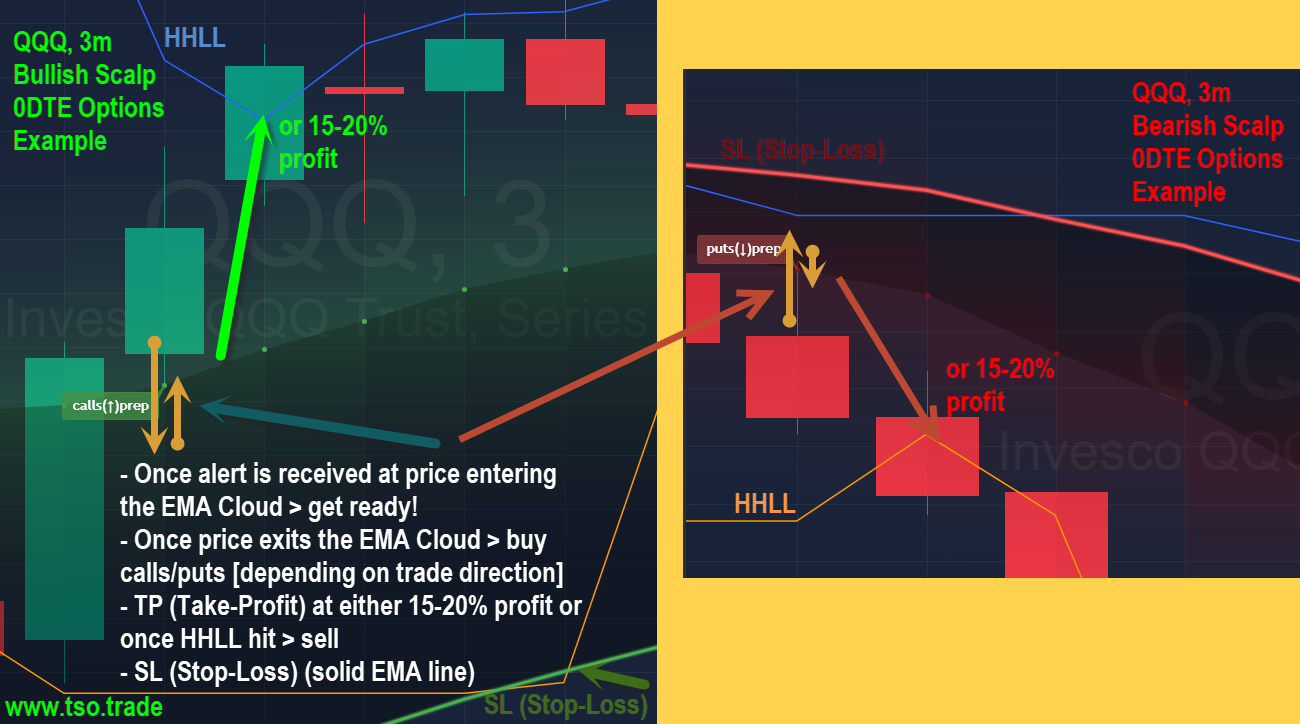
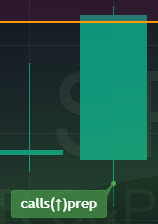
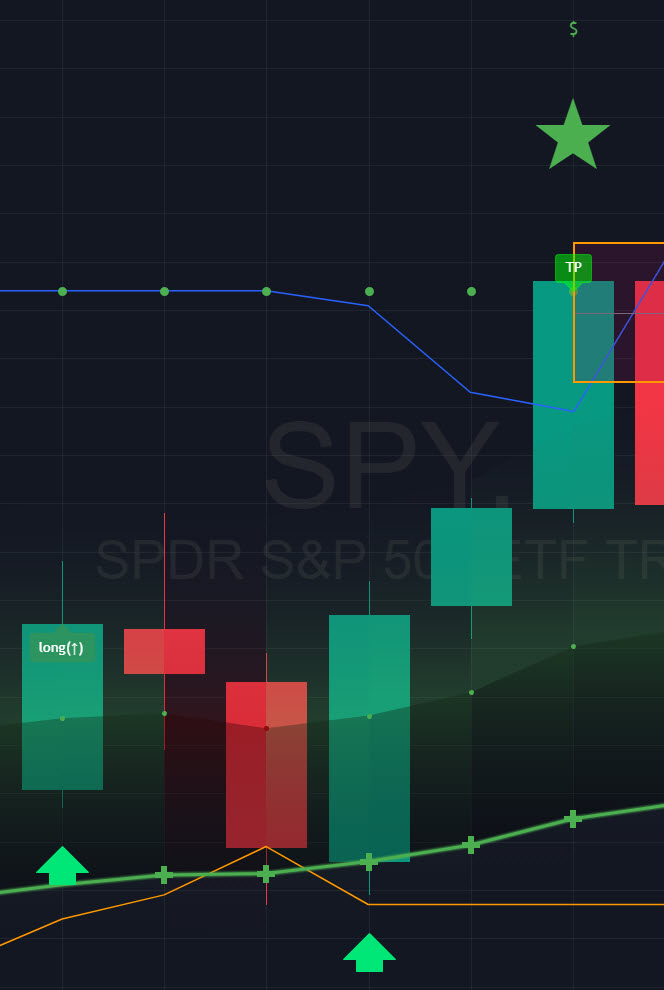
- 1) [OTE] EMA Scalping - LONG[Progressive] (↑) prepare.
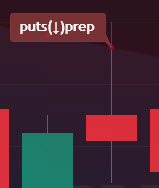
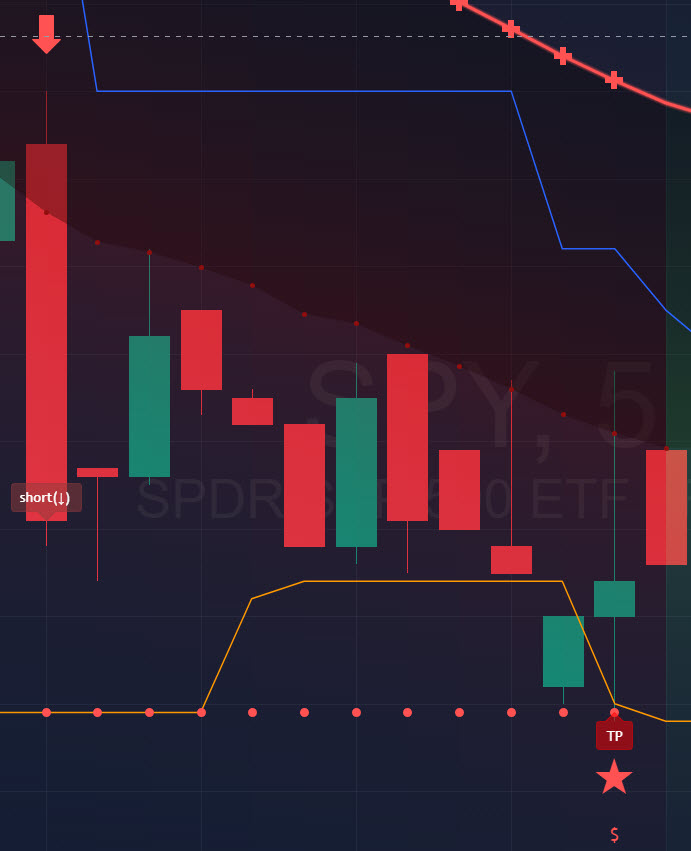
- 1) [OTE] EMA Scalping - SHORT[Progressive] (↓) prepare.
- NOTE: These are preparation labels (long(↑) / short(↓) or calls(↑) / puts(↓), labels are customizable, an Alert can be set as well), which is where you prepare to enter the trade, once the price exits/bounces off the EMA Cloud > a trade is opened in the direction of the exit from EMA Cloud, the idea is to catch the "bounce momentum".
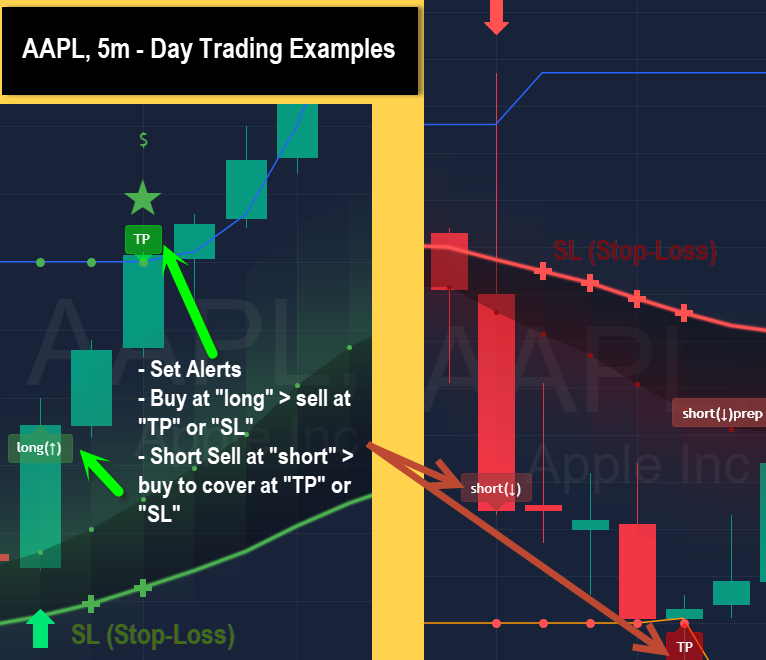
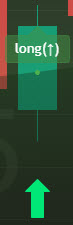
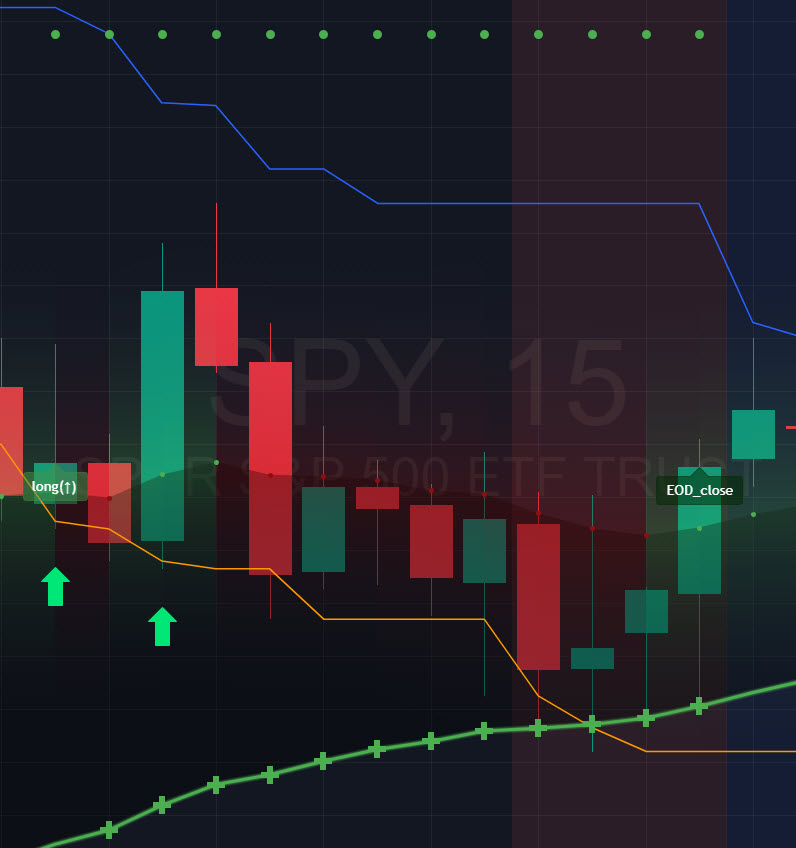
- 2) [OTE] EMA Day Trading - LONG[Conservative] (↑) open.
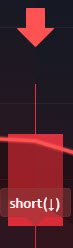
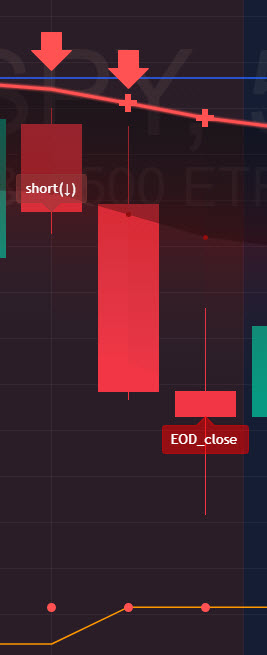
- 2) [OTE] EMA Day Trading - SHORT[Conservative] (↓) open.
- NOTE: The green/red arrows above/below bars will be shown on every signal of the algorithm, while the long(↑) / short(↓) labels are shown when an actual trade is open per trading engine, the trade is open until TP (Take-Profit) / SL (Stop-Loss) / EOD (End of Trading Day close) is hit.
- 2) [OTE] EMA Day Trading - LONG[Conservative] take-profit: green circles, stop-loss: green crosses
- 2) [OTE] EMA Day Trading - SHORT[Conservative] take-profit: red circles, stop-loss: red crosses.
- 2) [OTE] EMA Day Trading - LONG/SHORT[Conservative] - EOD (End of Day | Intraday style) close examples.
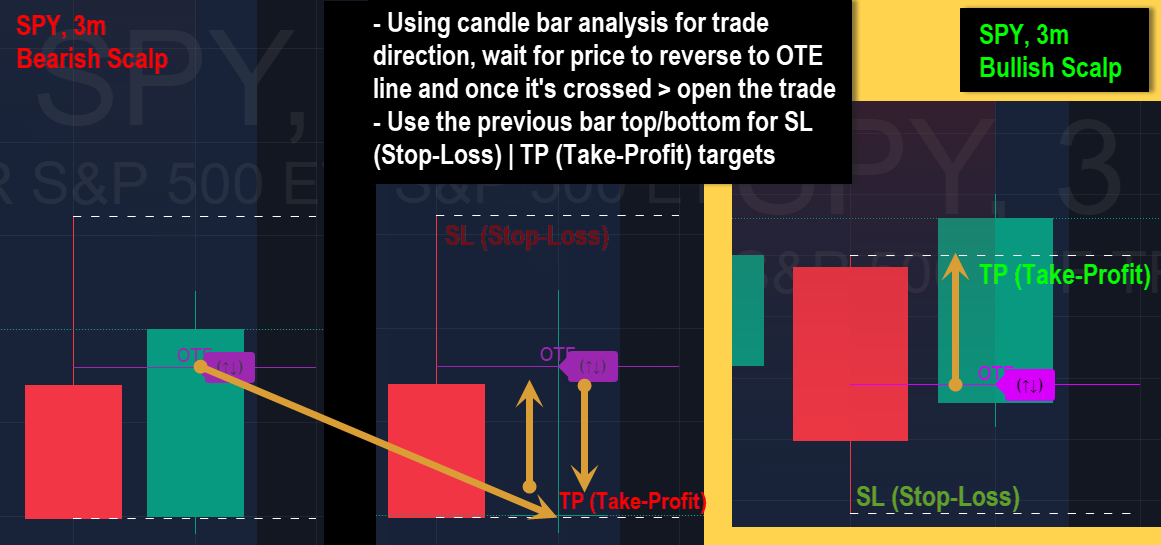
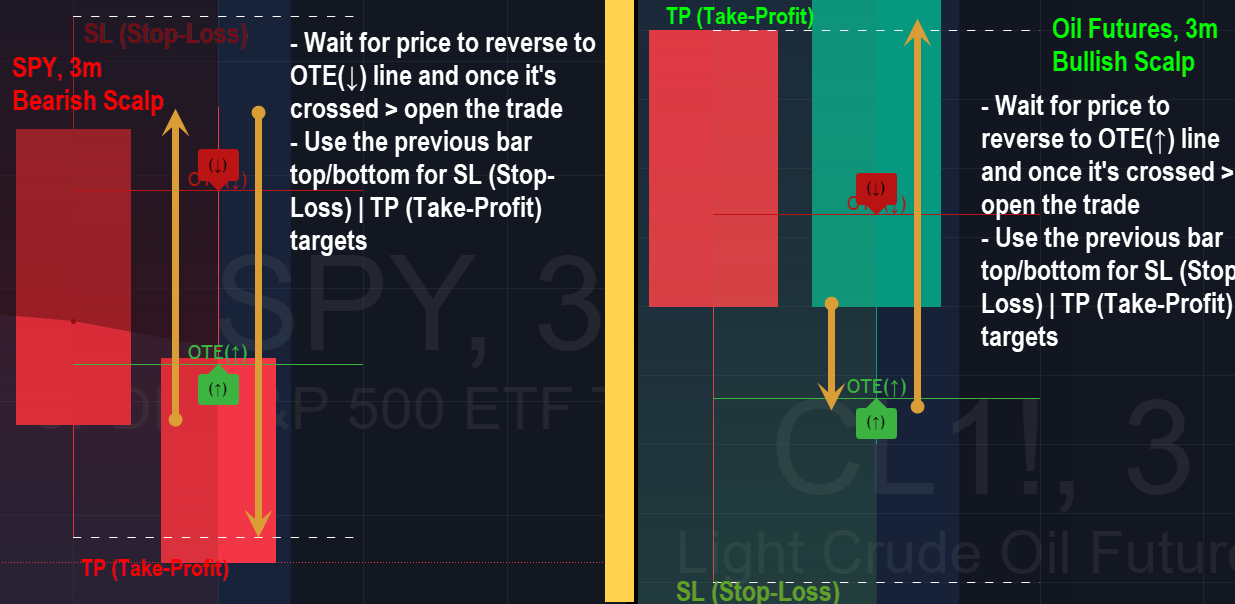
- 3) [OTE] Candlestick Bar Scalping Strategy
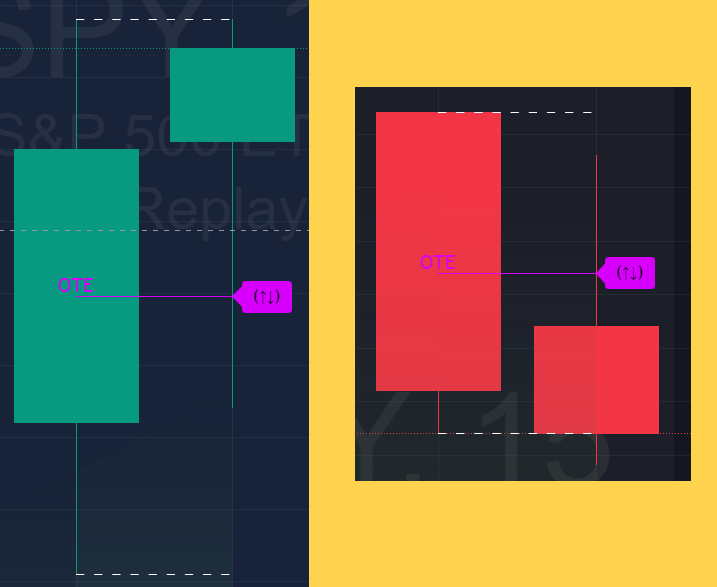
- OTE - Style: "mid": will show an OTE line at the middle of previous candlestick bar and will show a crossing label (↑↓) + Alert [both can be turned on/off in the indicator Inputs settings], the trade can be opened in either direction, take-profit and stop-loss can be set per previous candle bar high/low points. It's wise to use candle stick analysis for this strategy.
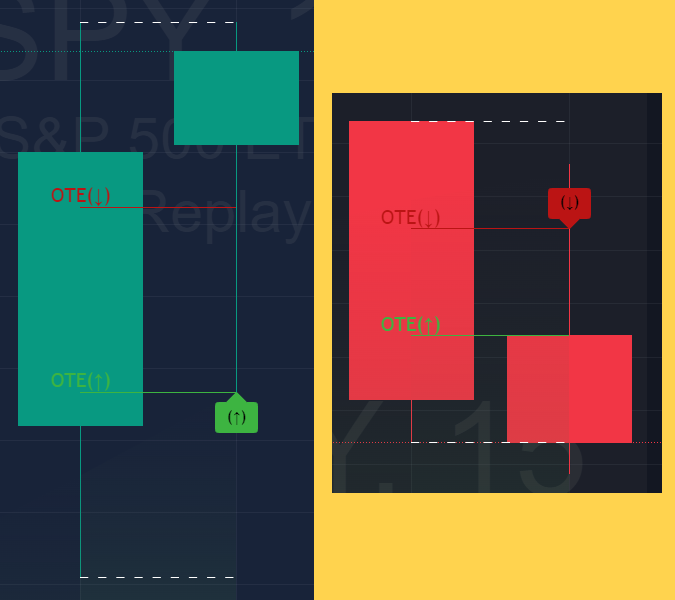
- OTE - Style: "1/3(↑↓)": will show OTE lines at 1/3rd distances of previous candlestick bar (with take-profit and stop-loss set per previous candle bar high/low points - profit/loss ratio becomes 3-to-1) and will show corresponding crossing labels (↑↓) + Alerts [both can be turned on/off in the indicator Inputs settings], the trade should be open per OTE label direction, it's wise to use candle stick analysis for this strategy as well.
-
GLOBAL GENERIC SETTINGS
>>> Show Options signal labels (long: 'calls' | short: 'puts'): Helps a lot when trading Options.
>>> Make signal labels slightly Transparent: Cosmetic modifications.
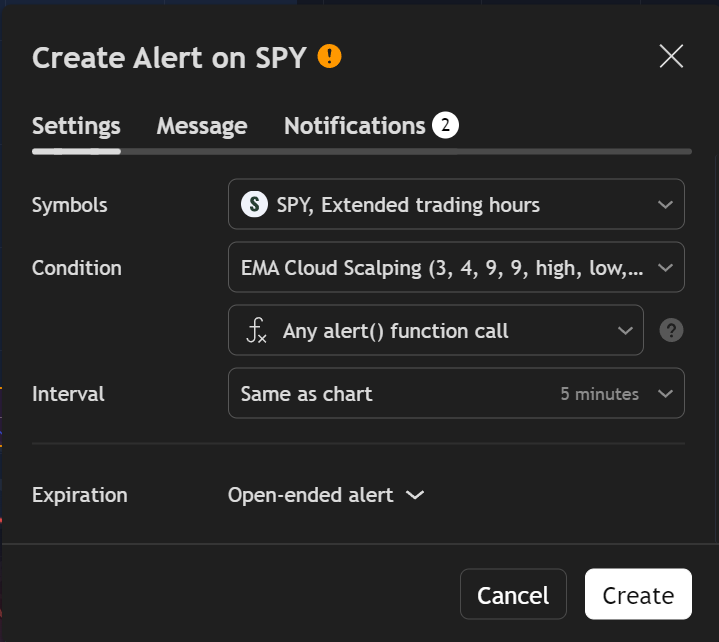
>>> Alert when EMA Cloud active/dotted line changes color: [To setup the Alert: Right-click the chart > Add alert > Condition: EMA Cloud Scalping / ∫x Any alert() function call > Create]
>>> RSI/MFI Trend Detector | Strength: The bigger the Strength number > the bigger/stronger RSI(Relative Strength Index)/MFI(Money Flow Index) Trends will be detected.
>>> EMA Cloud - Bullish Color: EMA Cloud visual cosmetics.
>>> EMA Cloud - Bearish Color: EMA Cloud visual cosmetics.
>>> EMA Cloud - Inside Color: EMA Cloud visual cosmetics.
>>> Turn On - Gradient Effects: EMA Cloud visual cosmetics.
>>> EMA Cloud Strength (1-15): The bigger the EMA Strength number > the bigger EMA Cloud will be. NOTE: That means there will be less SL (Stop-Loss) hits, but each SL (Stop-Loss) will be bigger.
>>> HHLL | Show HHLL (Highest High Lowest Low): Will show/hide the most recent highest/lowest critical price levels, which can be greatly used for SL (Stop-Loss) / TP (Take-Profit).
>>> HHLL | Take-Profit Top Band Lookback Period / Bottom Band Lookback Period: The longer the Lookback Period - the further will be the critical price levels.
>>> HHLL | Take-Profit Top Band Source / HHLL | Take-Profit Bottom Band Source: Source for calculating the critical price levels, 'high'/'low' works best.
>>> Show additional S&R (Support and Resistance) Blocks: This setting will show additional powerful support and resistance areas, which can be used for SL (Stop-Loss) / TP (Take-Profit) or as a market sentiment.
>>> S&R Per Order Blocks - Source / Top S&R Length / Bottom S&R Length: Just like for HHLL, S&R Blocks can be customized with the source for calculation and lookback period. -
INTRADAY ACTIVE TRADING SESSION CONFIGURATION (THIS IS FOR CONSERVATIVE APPROACH/ALERTS)
>>> Regional Active Trading Session Hours Schedule: If selected - trades will only open during regional active trading session, if 'OFF', there will be no trading schedule and trades will open 24/7.
Below 2 settings are only for "CUSTOM" "Regional Active Trading Session Hours Schedule":
>>>>> CUSTOM - Active Trading Session Hours Schedule (Local/TradingView Time Zone): Time selected below will be in Local/TradingView Time Zone | NOTE: Be careful with CUSTOM setting as it may allow the indicator to trade during per/after market and open trades after EOD (End of Day) hour if incorrect times are input!
>>>>> CUSTOM - EOD(End of Day) Close - Hour
>>> EOD(End of Day) Close - On/Off: Close the trade if it's still open at the end of active trading session (on the very last candle bar). NOTE: If 'Regional Active Trading Session Schedule' will be set to "OFF": there will be no EOD(End of Day) Close and trades will run overnight until either SL(Stop-Loss) or TP(Take-Profit) is hit!
>>>>> EOD(End of Day) Close - 1 candle bar before last: This is specifically for stocks as while usually indices can be closed 15minutes after the market closes, for stocks - the last candle bar closes at the same time with the market active trading session, which if closed - trades can't be closed until next day/session! Enable this setting for the trade to close/alert 1 candle bar before the last one, so there is still time to close the trade at the Broker (NOTE: depending on the timeframe, 1 candle bar can be: 15sec, 30sec, 1min, 3min, 5min, 15min, 30min, 45min, 1h).
Here is a table of all the included regional trading session hours. Region Local Time EST Time US/Canada NY_withPW(EDT) 09:30-16:00 09:30-16:00 NY_noPW(EDT) 09:30-15:00 09:30-15:00 Toronto(EDT) 09:30-16:00 09:30-16:00 Europe Amsterdam(CEST) 09:00-17:30 02:00-10:30 Frankfurt(CEST) 09:00-17:30 02:00-10:30 London(BST) 08:00-16:30 02:00-10:30 Stockholm(CEST) 09:00-17:25 02:00-10:25 Zurich(CEST) 09:00-17:20 02:00-10:20 Eurasia (CST > China Standard Time) Hong Kong(HKT) 09:30-16:00 20:30-03:00 Mumbai(IST) 09:15-15:30 22:45-05:00 Shanghai(CST) 09:30-15:00 20:30-02:00 Shenzhen(CST) 09:30-14:57 20:30-01:57 Riyadh(AST) 10:00-15:00 09:00-14:00 Seoul(KST) 09:00-15:30 19:00-01:30 Taiwan(CST) 09:15-13:30 20:15-00:30 Tokyo(JST) 09:00-15:00 19:00-01:00 Australia Sydney(AEDT) 10:00-16:00 18:00-00:00 Brazil Sao Paulo(BRT) 10:00-17:55 08:00-15:55 South Africa Johannesburg(SAST) 09:00-17:00 02:00-10:00 -
1) [OTE] EMA SCALPING - PROGRESSIVE STRATEGY
>>> Show PROGRESSIVE/scalping preparation Labels on chart: If turned on - there will be labels shown on chart when price enters EMA Cloud, so you can get ready to open trade once price exits the EMA Cloud, confirming the trade.
>>> Turn on PROGRESSIVE/scalping preparation Alerts: With this setting checked, you will be alerted when price enters EMA Cloud. [To setup the Alert: Right-click the chart > Add alert > Condition: EMA Cloud Scalping / ∫x Any alert() function call > Create]
-
2) [OTE] EMA DAY TRADING - CONSERVATIVE STRATEGY
>>> Show CONSERVATIVE signals arrows: NOTE: These will show regardless of Trading Schedule and even if a trade is already open per Trade Engine!
>>> Turn on CONSERVATIVE Trading Engine / Show CONSERVATIVE labels (signals/TP/SL): NOTE: until trade hits TP or SL > there will be no new trades open per trading engine!
>>> Turn on CONSERVATIVE Trading Engine Alerts (signals/TP/SL): [To setup the Alert: Right-click the chart > Add alert > Condition: EMA Cloud Scalping / ∫x Any alert() function call > Create]
>>> CONSERVATIVE: Skip opposite candle bar formation signals: Basically - skip signals, where candle bars are opposite formation vs direction per bar color (for example: bearish green hammer)
>>> CONSERVATIVE: Skip doji (indecisive) candles bar signals: Basically - skip signals, where candle bar structure is doji / indecisive.
>>> CONSERVATIVE: Skip signal if candle bar engulfs EMA Cloud: This should skip uncertain signals where candles bars are huge or distance inside EMA is too small - usually meaning an uncertain trend. CONFIGURATION: 'Body': only if candle bar body engulfs the whole EMA Cloud - the signal will be skipped | 'Sticks': as long as candle bar sticks engulf the whole EMA Cloud - the signal will be skipped.
>>> CONSERVATIVE EWO (Elliot Wave Oscillator) signal confirmation: LONG signal will only be opened if EWO is bullish / SHORT if EWO is bearish
>>> CONSERVATIVE ATR (Average True Range) signal confirmation: LONG signal will only be opened if ATR is bullish / SHORT if ATR is bearish
>>> CONSERVATIVE: TP (Take-Profit) System: 'HHLL': Highest High / Lowest Low per lookback period (can be customized below) | 'Manual Distance': Instrument distance (example: SPY > 0.4 > Take Profit will be taken if SPY moves 0.4 points in your favor).
>>> 'CONSERVATIVE: SL (Stop-Loss) System: 'EMACloud_dynamic': SL (Stop-Loss) is set to trail slow MA of the EMA Cloud, the solid line; 'HHLL': SL (Stop-Loss) is set to either Highest High (for short trade) or Lowest Low (for long trade); 'Manual Distance': Instrument distance (example: SPY > 0.4 > Take Profit will be taken if SPY moves 0.4 points in your favor).
-
3) [OTE] CANDLESTICK BAR SCALPING STRATEGY
>>> Show OTE (Optimal Trade Entrance) line: A line will be drawn at the middle of previous bar, where you wait for the price to reverse and only enter the trade once the price crosses it - thus lowering the risk/potential loss, while increasing potential profit.
>>> Show OTE (Optimal Trade Entrance) Crossing - Labels: With this setting checked, you will be alerted when price crosses the OTE (Optimal Trade Entrance) lines. [To setup the Alert: Right-click the chart > Add alert > Condition: EMA Cloud Scalping / ∫x Any alert() function call > Create].
>>> Show historical OTE lines: Show previous OTE (Optimal Trade Entrance) lines.
>>> Extend OTE lines/labels by # of bars: Extends OTE (Optimal Trade Entrance) lines and labels ahead by the # of bars entered here, originally default it was 5, otherwise it's simply a matter of preference.
>>> OTE - Style: 'mid': OTE (Optimal Trade Entrance) line will be place exactly at the middle of previous candle bar | '1/3': There will be 2 OTE (Optimal Trade Entrance) lines at 1/3 of the previous candle bar, the top one for Short trades and the bottom one for Long trades.
>>> OTE 1/3(↑) - Bullish Color | OTE 1/3(↓) - Bearish Color | OTE mid - Color: Colors of '1/3(↑↓)' style OTE (Optimal Trade Entrance) lines for bullish/bearish trades.
>>> Turn on OTE (Optimal Trade Entrance) - Alerts: With this setting checked, you will be alerted when price crosses the OTE (Optimal Trade Entrance) lines. [To setup the Alert: Right-click the chart > Add alert > Condition: EMA Cloud Scalping / ∫x Any alert() function call > Create].
>>> Bar Colors reflecting very short-term sentiment: This is combination of EMA Cloud itself moving up/down from last Candle Bar AND current Candle Bar highest and lowest points being higher/lower than previous one. (Lime: Bullish | Maroon: Bearish).
>>> OTE Crossing previous Bar Color/Sentiment Confirmation: With this setting turned on, both OTE Style Crossing Labels will show/alert ONLY if confirmed by previous candlestick bar sentiment (bullish/bearish[📈/📉]). For example, if previous candlestick bar is Lime (Bullish) - 'mid' OTE Style Crossing Label will show 📈(↑) (with this setting turned off - it will show both directions label (↑↓), where you have to decide which way to open the trade); Similar, for '1/3(↑↓)' OTE Style, with previous bar being Lime (Bullish) - it will ONLY show 📈(↑) Crossing Label and skip the (↓), even if the crossing condition for (↓) occurs, same way it will show 📉(↓) only if previous candlestick bar is Maroon (Bearish).
-
Adding Alerts in TradngView:
-Add indicator to chart
-Under indicator Settings > Inputs, turn on/check[x] each Alert setting as needed
-Right-click anywhere on the TradingView chart
-Click on Add alert
-Condition: Select this indicator by it’s name
-Immediately below, change it to "alert() function calls only", as other wise there will be 2 alerts for every alert!
-Expiration: Open-ended (that may require higher tier TradingView account, otherwise the alert will need to be occasionally re-triggered)
-Alert name: Anything
-Hit “Create”
-Note: If ANY Settings within the indicator will be changed > DELETE the current alert and create a new one per steps above, otherwise it will continue triggering alerts per old Settings!
Check out our other indicators:
> [Camarilla Pivots] with Signal Clean Up Analysis and Alerts (TSO)
>>>>>> [Day Trading Indicator] EMA Cloud Scalping (TSO)
> [Opening Range pre-Market Breakout Screener] with Alerts (TSO)
> [Opening Range Breakout] Support and Resistance with Backtest (TSO)
> [Options Covered Calls/Puts with TA] with Alerts (TSO)
> [Round Numbers] with Signal Clean Up Analysis and Alerts (TSO)
> [Auto Trend Lines] with Backtest (TSO))
> [Pivots Consolidation Breakout Screener] with Alerts (TSO)